Local Adjustments
(12 september 2020)
Introduction
Local editing in RawTherapee is based on RT-spots, which are similar in principle to the U-Point concept originally used in Nikon Capture NX2 © and subsequently in the Nik Collection ©, DxO PhotoLab © and Capture NXD ©. RT-spots use algorithms developed specifically for RawTherapee by Jacques Desmis.
This approach is completely different to the more familiar local editing methods used in applications such as the GIMP, Photoshop © etc., which primarily use selection tools such as lassos, magic wands etc., associated with brushes, layers and blend masks. These methods can be time consuming and difficult to use accurately when complex shapes are involved.
An RT-spot consists of either an ellipse or a rectangle with a variable-diameter spot at the center.
The shapes have four control points, which can be adjusted independently or symmetrically, and future developments will provide enhanced shape manipulation.
The RT-spot algorithm uses shape detection based on ΔE (the change in the visual perception of two given colours) to select the parts of the image to be modified inside the ellipse or rectangle .
The extent to which these modifications are applied can be finely controlled allowing for very precise selections. Further refinement is possible with additional parametric masks but the shape-detection algorithms should be sufficient for the vast majority of local editing requirements.
RT-spots can also be used to exclude the algorithm from influencing certain parts of the image .
The modifications that can be carried out are extensive and incorporate most of the functions available in RawTherapee’s global adjustment tools along with some additional tools available only in the Local Adjustment tab.
The tools are grouped in the following modules (Tool name - position in pipeline):
Color & Light - 11
Adjust color, lightness, contrast and correct small defects such as red-eye, sensor dust etc. Other functions include a graduated filter, L*a*b* curves and blend modes.
Shadows-Highlights & Tone Equalizer - 5
Adjust shadows & highlights either with shadows & highlights sliders or with a tone equalizer. Can be used instead of, or in conjunction with the Exposure module. Can also be used as a graduated filter.
Vibrance & Warm-Cool - 3
Adjust vibrance (essentially the same as the global adjustment). Carry out the equivalent of a white-balance adjustment using a CIECAM algorithm.
Log Encoding - 0
Adjust under-exposed or high-dynamic-range images using a log-encoded algorithm.
Contrast Attenuator-Dynamic Range Compression & Exposure - 10
Modify exposure in L*a*b* space using Laplacian PDE algorithms to take into account dE and minimize artifacts.
Common Color Mask - 13
A tool in its own right. Can be used to adjust the image appearance (chrominance, luminance, contrast) and texture as a function of Scope.
Soft Light & Original Retinex - 6
Apply a Soft-light blend (identical to the global adjustment). Carry out dodge and burn using the original Retinex algorithm.
Blur-Grain & Denoise - 1
Can be used to blur backgrounds, soften skin, add film grain and denoise.
Tone Mapping - 4
Same as the tone mapping tool in the main menu. The main menu tool must be de-activated if this tool is used.
Dehaze & Retinex - 9
Dehaze and Retinex (Advanced mode only). Useful for dehaze, local contrast with high values and simulation of ‘clarity’.
Sharpening - 8
Uses RL deconvolution sharpening. View at 1:1
Local Contrast & Wavelets - 7
- Local Contrast: basically the same functions as “Local Contrast” in the “Detail” tab
- Wavelets: based on “Wavelet Levels” in the “Advanced” tab with essentially the same features (clarity, contrast, blur…see documentation). Its use in “Local Adjustments” provides additional possibilities such as the removal of large blemishes, grease stains etc.
CBDL - 2
Contrast by detail levels. Can be used to remove sensor or lens marks.
Each tool module can be toggled between Basic, Standard & Advanced modes. The default mode can be set in RawTherapee’s Preferences window.
Getting started
Activating local adjustments
- In the tab bar, select the "hand" icon (Local Adjustments tab)
- Turn on the "Local Adjustments" power button (if it is not already activated) and expand the "Settings” module.
- Select "Add"
Preparation
Position the RT-spot at the desired location. In this case, we want to increase the saturation of the red flower and reduce the luminance (lightness) without affecting the rest of the image:
- Move the center of the RT-spot so that it is located on an area representative of what you want to change.
- Position the 4 delimiters well beyond the flower.
- Select the "Lockable Color Picker" and locate 3 colors: a) one on the red flower, b) one on the blue sky, c) one on a green leaf.
- In the example the 3 colors are:
- red flower L=48.6 a=74.4 b=47.0
- blue sky : L=68.6 a=-3.1 b=-16.6
- green leaf : L=48.3 a=-28.3 b=51.4
Raw file: [1]
Adding the Color & Light tool
In the settings menu, choose "Add tool to current spot".
- You will see a list of choices : "Color & Light - 11",..., "Log Encoding – 0" etc.. For each RT-spot you can associate 1 or more tools from the list. The processing order in the pipeline corresponds to the number at the end of the tool description : "Log Encoding - 0" is first (if it is activated), "Color & Light -11" is the last one. This is also the case for the associated masks.
- Select "Color&Light - 11"
Adjusting luminance (lightness) and chrominance
- Set "Lightness" to -70
- Set "Chrominance" to 130
- Review the results
- The red flower now has a new color L= 41.0, a = 65.6, b = 52.8
- the sky is unchanged
- the green leaf is unchanged
Color Tool Scope and Transition Value
In the "Settings" module
- Observe the effect of moving the "Scope (color tools)" slider
- if you reduce the value (default 30) only a part of the reds will be affected.
- if you increase the value, the sky, then the green leaf, then the whole image will be taken into account (Scope=100)
Leave the Scope value at 100 and in the "Settings" module select "Show additional settings"
- Observe the effect of moving the "Transition value" slider:
- reduce the value to 5
- increase the value to 100 and see the result
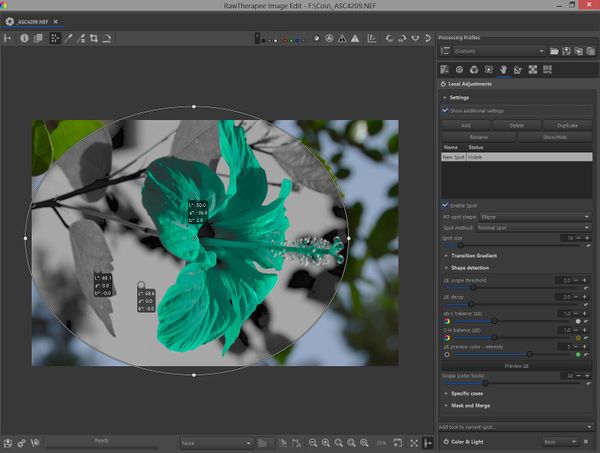
Previewing the adjustment area using deltaE - ΔE
You can preview the areas of the image that will be affected by any changes. The preview does not show the changes themselves or the transitions, but allows you to set the scope of any adjustments. There are two possibilities:
- Use the "Preview ΔE" button located in "Settings". This will only work if you have activated one (and only one) of the tools in "Add tool to current spot" menu.
- Use the "Preview ΔE" option in the "Mask and modifications" menu associated with a particular tool (standard and advanced modes only). In this case the GUI takes into account any adjustments made with the tool and works regardless of the number of activated tools.
You can vary the intensity and color of this preview with "ΔE preview color " in the "Shape detection" section of the "Settings" module . The preview will also let you see the effect of varying the other sliders in the Shape detection section.
Viewing the changes
To see the changes :
- Go to "Mask and modifications" > "Show modifications without mask".
- You can visualize the effects of any changes to luminance, contrast, color and saturation, as well as any changes to the texture or structure of the image.
- You can also visualize the incidence of the transition settings:
- "Transition value": percentage of the area that will receive the full effect of any adjustments before dropping off to zero.
- "Transition decay": the rate with which the zone of action decreases
- "Transition differentiation XY": difference in coverage between abscissa and ordinate
Try out the following and observe the effect:
- Change the Scope (color tools). Remember that the Scope slider acts on deltaE
- Transition settings
- Tool settings (luminance, chroma, etc.)
Work on the overall image using an "excluding" spot
Local adjustments are not limited to local touch-ups. You can also use the Local Adjustment tools to process the entire image. Currently you have to expand a rectangular spot manually to cover the image completely but this will be done automatically in future versions.
In "Settings" enable "Show additional settings":
- Set the "RT-spot shape" to a rectangle
- Position the 4 delimiters outside of the preview
- Set the transition to 100 (or another value if you wish to generate a gradient, bearing in mind that there are other tools for making gradients). You are now ready to use all the tools in full image mode
Example: changing the color of the green leaves, except for one
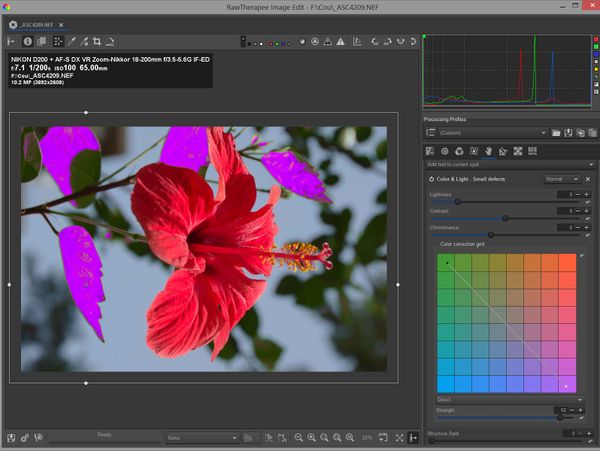
Changing the color of the leaves
- You can use of the "a" and "b" components of "Lab" in the "Color correction grid ", by choosing "direct" (combobox under the grid) and a high value of "Strength". Moving the dots on the grid as shown will change the color of all the leaves.
- You can adjust if necessary with "Scope (color tools)".
- The other colors in the flower, sky etc., are not modified.
Restoring the green color to one of the leaves
- Add a second RT-spot ("Add" in the "Settings" module)
- Choose "Spot Method” = "Excluding Spot”
- Move the RT-spot to the leaf to be changed and expand the spot well beyond the edges of the leaf.
- Adjust "Scope” (under the "Excluding" heading in "Settings") until you get the desired effect.
- If you wish, you can use the "Excluding" spot in the same way as a normal RT-spot and add tools such as Denoise, Blur, etc.
Correcting red-eye and removing sensor defects
3 steps: preparation, RT-spot adjustment, red-eye removal
Preparation
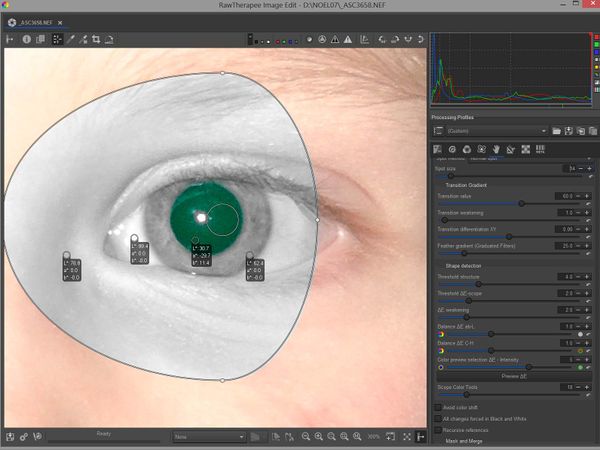
- Choose a wide selection around the eye
- Put the RT-spot on the red area of the eye (pupil)
- Set 4 "Lockable color pickers" so that you can see the changes
Adjusting the RT-spot
- Add the "Color and Light" tool
- Press the "Preview deltaE" button in "Settings" .
- Adjust the RT-spot to obtain the desired level of selection.
- here we have chosen to reduce the spot size = 14
- "Scope (color tools)" = 18
Removing the red color
- In the "Color and Light" tool, reduce the chrominance to -100
- Observe the result :
- the pupil of the eye has almost no dominant color anymore
- the iris, cornea and facial skin are unchanged
- you may need to change the "Transition value" (lower it) and "Transition decay" (increase it) in "Settings" depending on the case.
Removing sensor defects or spots
The principle is the same as above for removing small sensor faults but in this example we will use different tools
- Either CBDL (Contrast By Detail Levels),
- Or Wavelet pyramid2 - Contrast by levels (Advanced).
- In both cases, reduce the contrast for the lower levels of decomposition
- Adjust "Blur levels” if necessary (wavelet pyramid1)
- Use a low "Transition value" (less than 20) and high "Transition decay" (greater than 15).
- The minimum size of the RT-spot for the CBDL and Wavelet pyramid2 decomposition to function is 32x32 pixels. There are workarounds such as the use of transitions and deltaE to deal with defects smaller than the spot.
Example: removing multiple spots using wavelet pyramid2
- Looking at the image below, we can see that it is blotchy
- A possible solution
- Activate the tool "Local Contrast & Wavelets".
- Choose "Advanced" in the first combobox and then "Wavelet" in the second combobox.
- Adjust “Scope” to 20
- Go to Pyramid2 and activate "Contrast by level".
- Set high values of "Attenuation response", "Offset" and "Chroma levels" (if necessary)
- Activate the "Contrast by level" curve and reduce the contrast for the lower levels.
Dodging and burning
In many portraits, or photos where light falls directly on the skin, an unpleasant contrast-enhancement phenomenon occurs. Some parts of the skin are slightly overexposed, while others are slightly under-exposed.
- Traditionally this problem is treated with masks and layers and there are numerous tutorials for doing this with the GIMP and Photoshop (c). You could probably use RT's "Local adjustments" masks also.
- Here we are going to use the "Original Retinex" concept (based on Ipol research). It was developed in the 1970s and was originally designed for this sort of application and not for the way it has been subsequently used in Rawtherapee and elsewhere. We are going to:
- use one or more adjustable-threshold Laplacian functions
- solve the Poisson equation (PDE - Partial Derivative Equation)
- balance the luminance values.
There are 3 steps: preparation, Laplacian settings and preview, result
Preparation
- The deltaE adjustment steps, the "Scope" (make sure you use the Original Retinex Scope) and the transition adjustment principles are identical to the previous examples and won't be repeated here.
- The portrait we are going to use has had the eyes masked for confidentiality reasons.
- Choose "Add tool to current spot..." : "Soft Light & Original Retinex" - "Advanced" - "Original Retinex"
Adjusting the Laplacian threshold and viewing the changes
- Adjust the "Strength" slider (which takes into account the threshold of the first Laplacian operator)
- Adjust the "Laplacian threshold deltaE" slider (which takes into account the deltaE of the image to act on a second Laplacian operator). This processing is upstream of the Scope algorithms and can take into account differences in the backgrounds..
- View the modifications by choosing: "Show process Fourier" : "Show modifications without mask".
Results
A similar algorithm is used in the "Dynamic range compression & Exposure" tool. It can be used to process images with large differences in exposure which are often globally underexposed.
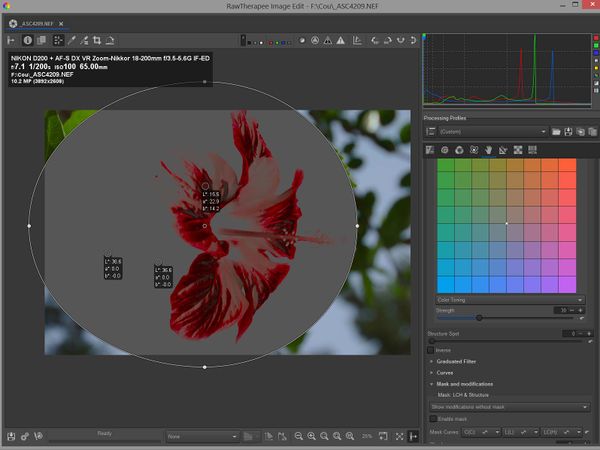
Making a graduated filter based on luminance, chrominance and hue (gradient filter)
Preparation
- Choose the flower image that was used in the first example.
- Identify 7 points with the "Lockable color picker".
- Add the "Color and Light" tool to the current spot and select "Advanced" mode.
Raw file: [2]
Making a graduated filter.
Arbitrarily we choose the following settings
- Luminance gradient strength = -0.44
- Chrominance gradient strength = -1.13
- Hue gradient strength = 2.69
- Gradient angle : -87.6
- Scope (color tools) = 30
- Feather gradient(settings) = 25
Changing the default settings
- Try to gradually change "Scope (color tools)" by increasing the value to 70, 75, 80, 85, 90, 100
- Change "Feather" and note the variations
- You can also change the values of the gradients (L, C, H, angle).
- And if you wish, the values of "Color and Light".
Five ways to change the exposure and lift the shadows
This example is for demonstration purposes only so that we can see the various (non-exhaustive) possibilities for adjusting exposure. The settings are arbitrary.
- The image is a difficult one with deep shadows and a central area that is almost overexposed.
- Five possible methods are shown with arbitrary settings
- Shadows Highlights
- Tone Equalizer
- TRC (Tone Response Curve)
- Log Encoding
- Exposure (PDE algorithms & exposure)
We could also have used :
- Contrast curves,
- or lifted the shadows with "Lightness" (Color and Light),
- or used a graduated luminance filter
- ...
Preparation
- Scope is set to 50 (use the "Scope (color tools)" slider for "Shadows Highlights" and the separate "Scope" sliders for each of the Log Encoding and Exposure tools)
- Try varying this value between 20 and 100
Raw file: [3]
Using Shadows & Highlights
Add tool to current spot..."Shadows Highlights - Tone Equalizer"
- Select "Shadows Highlights"
- Try changing "Shadows tonal width" and "Highlights"
Using the Tone Equalizer
Add tool to current spot..."Shadows Highlight - Tone Equalizer"
- Select Tone Equalizer
- Try sliders 2, 3 et 4
Using the Tone Response Curve (TRC)
Add tool to current spot..."Shadows Highlight - Tone Equalizer"
- Select TRC
- Increase the "Slope" to 150. and then come back to 60
- Try reducing and then increasing the gamma and observe the effect
Using Log Encoding
Add tool to current spot..."Log Encoding"
- Note that the "Scope" slider in this case is in the "Log Encoding" tool: set "Scope" to 50
- Click on the "Automatic" button
- Adjust the "Target gray point"
Using Exposure
Add tool to current spot..."Contrast Attenuator - Dynamic Range Compression & Exposure"
- Select "Standard"
- Adjust "Exposure compensation ƒ" (a Laplacian and a Fourier transform are applied)
- Set the "Exposure Tools" sliders to: black = -1500, shadows = 50
- By default "Highlight compression" is 20. Vary it to see the effect
- Try varying the above settings
Recommendations
For portraits and images with low color contrast:
- Use the "Exposure" slider with care because the algorithm (which is similar to the one used in the Exposure tab) is not well adapted to cases such as portraits which have subtle color variations in skin tones. The algorithm was improved recently (July 5, 2020) by the addition of a Laplacian operator to resolve the differences in contrast but it is still not the best solution for these cases.
- Try using the "Tone equalizer" or "TRC" instead.
If you do use "Exposure", then it is recommended (but not mandatory) to change the parameters of "Shape detection" in "Settings" as follows:
- Increase "ΔE-scope threshold"
- Reduce "ΔE decay"
- Set "ab-L balance (ΔE)" to L
- Adapt "Scope" if necessary
High dynamic range images - use Log Encoding or the "PDE" algorithms in the "Contrast Attenuator-Dynamic range compression & Exposure" tool
High dynamic range images are one of the recurring problems in image processing. There are already several algorithms available in Rawtherapee that can be used, more or less successfully, to reduce the dynamic range: Dynamic range compression, Shadows / Highlights, Tone Equalizer, Tone Response Curve, etc.
- In this example we are going to use the "Log Encoding" tool (derived from the darktable filmic module and adapted by A. Griggio for ART). The tool has undergone further adaptation by J. Desmis for use in Rawtherapee local adjustments
- To demonstrate the possibilities of this module, we are going to use it to make a luminance gradient, without using the "Graduated filter", which is present in the "Log Encoding" menu.
- Three steps: preparation, automatic settings, adjustments
Preparation
- Set the RT-spot so that :
- the center is at the bottom left corner of the image
- the upper right corner is at the limits of the image
- Go to "Add tool to current spot...". Go to "Log Encoding " (the tool has been voluntarily disabled in the screenshot)
Raw file : [4]
Automatic settings
- Press the "Automatic" button
- The image will brighten
- Click the "Automatic" button again to see the settings more clearly.
- The values Black Ev = -6.7, White Ev = 6.9, indicate a large dynamic range = 13.6 EV
- Source gray point : value (set to automatic) = 1.2
- These settings (that you can change) are the result of calculations made upstream in the pipeline.
Adjustments
You can now adapt the image to taste:
- Play with the diagonal gradient by acting on "Settings" – "Transition Gradient": "Transition value" = 45. You can also act on "Transition decay" and "Transition differentiation XY" (try it out to see how it affects the result)
- Modify the distribution of the action inside the image by setting "Scope" (Log Encoding) = 50
- Change the global luminance of the image by setting "Target gray point" = 22.0
Another solution using the "Dynamic range compression and Exposure" tool.
We can combine two PDE algorithms used in the "Contrast attenuator" and "Dynamic range compression" options:
- Contrast attenuator
- Dynamic range compression
Processing a hazy image
We are going to process a very hazy image by first applying the global "Haze Removal" tool in the "Detail" tab and then touch up the sky and horizon using local Retinex.
Original Image
Raw file: [5]
We could also have used "local dehaze"...and an RT-spot. However when you look at the image there is still a lot of haze in the background and the hills.
Additional processing with local Retinex
- Choose "Add tools to current spot...". : Dehaze - Retinex - 'Advanced'.
- Try varying the settings
- Adjust the "transmission map" curve if necessary by increasing the attenuation on the right side of the curve .
- Now look at the hills and the sky on the horizon!
Using the Denoise module
Several applications are possible.
- On selected areas to refine any denoising adjustments carried out using the denoise module in the "Detail" tab. In this case keep the denoising to a minimum in the "Detail" tab.
- By processing the whole image using the denoise module in "Local Adjustments" and excluding parts of the image with an "Excluding" spot.
- Used on its own to reduce noise in low-noise images - for example, to remove noise from the sky or a face
- Used on its own to reduce the noise in a selected area and deliberately leave the noise in the rest of the image for artistic purposes
We are going to look at an example using this last case.
The image of the young girl is particularly noisy and has strong chromatic noise.
Raw file : [6]
Zoom 100%
Which settings should we use for denoising?
- The position of the spot and its size are important. We are going to chose a part of the face with strong chromatic noise and use a large "Spot size" for the RT-spot .
- The choice of the "Scope" parameter is also important. In this case, where the noise occupies almost the whole color spectrum (red, green, blue, yellow), a high value of scope must be chosen (90 in this case). If on the other hand the image to be processed has mainly luminance noise, then the "usual" scope value should be chosen, i.e. around 30, to allow the algorithm to differentiate the action according to the colors.
- There are several differences between the local adjustments denoise function and the global denoise module in the Detail tab: :
- possibility of using a curve to adjust the luminance noise level according to the level of detail (from 0 to 6 depending on the position on the abscissa of the curve).
- a distinction is made depending on the level of detail i.e. if levels 3 and above are greater than 20% of the ordinate of the curve, the luminance noise reduction will be more aggressive.
- the "dark - light" differentiation for luminance is handled by an "equalizer", rather than by "gamma".
- possibility to differentiate the action between "Fine chroma" (impulse noise and low chrominance noise for levels 0 to 4) and "Coarse chroma" (packets of noise, blotches for levels 5 and 6)
- a "red green" / "blue yellow" equalizer which can be useful for low-noise images.
- an extra "Chroma detail recovery" slider using DCT (a Fourier-related discrete cosine transform).
- an added "Luminance & chroma detail threshold (DCT)" slider to differentiate the action depending on the edges ("Edge detection").
A moment of madness - try wavelets!
An example … (don't run away, it isn't as difficult as all that)
Original image, with "Exposure compensation" = +1.5
The same image with "Wavelet level tone-mapping".
- Leave all settings at their default values
- Enable the "Wavelet pyramid2" tool ("Advanced" mode)
- Set "Scope" (wavelets) to 80
- Then use the settings visible on the screenshot
- Of course the appearance is subjective so feel free to change the settings
- This version of "Tone mapping" is different from the other algorithms implemented in Rawtherapee (Fattal for "dynamic range compression" and Mantiuk for "Tone mapping" & Log Encoding) and is specific to Rawtherapee Wavelets.
Three ways of increasing texture
For demonstration purposes we can use
- Tone-mapping (Mantiuk)
- Retinex
- Wavelets
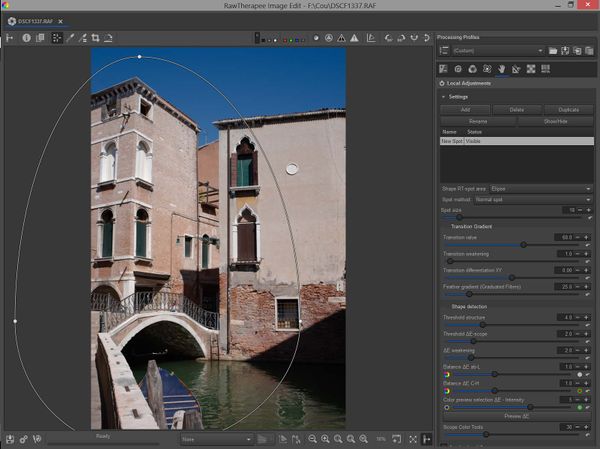
Preparation – original image - Venice
Raw file: [7]
Using Tone mapping
- Note that the option "Normalize luminance" is checked. This ensures that the average and variance of the luminance values are the same as in the original image.
- Use "Advanced" mode and adjust "Edge stopping" and "Scale".
Using Retinex
- Note that the option "Normalize luminance" is checked. This ensures that the average and variance of the luminance values are the same as in the original image.
- Note also that the "use Fast Fourier Transform" option is checked
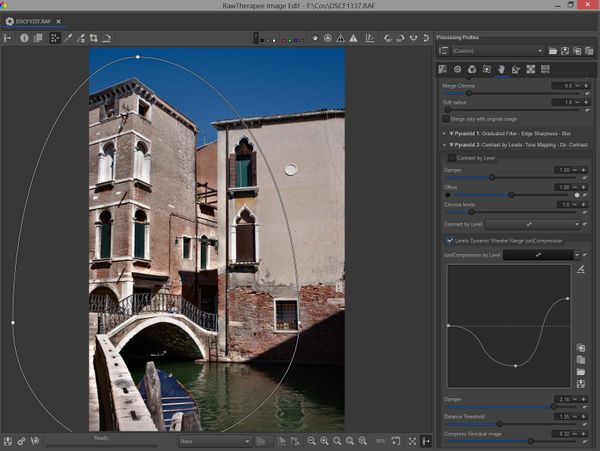
Using Wavelets
- Note the use of "Dynamic range compression", the values of "Attenuation response", "Balance threshold" and "Compress residual image".
- Try "Contrast by level".
- Also try "Directional contrast",
- or a combination of these parameters


