Color Management addon/de
Todo: übersetzen
Seite angelegt, um darauf referenzieren zu können
Farbmanagement (Zusatz)
Colorimetry concepts
This document aims at several objectives about colorimetry:
1. To summarize the raw file processing pipeline from a colorimetry point of view and to highlight key points and gaps
2. To explain the main steps principles in order to allow the user to be able to weight what is at stake.
3. To explain the use of some functions that may look obscure to newcomers.
Note: This document only deals with RawTherapee 4 and computing with real numbers, and not RawTherapee 3. More over it does not take into account possible malfunctioning (bugs) still unsolved !
Warning
- This document doesn't aim to deal with the whole colorimetry aspects that aren't specific to RawTherapee, like for instance:
- the printing,
- screens calibration.
- However, it is recommended to calibrate the screens with one of the many products in the market: colorimetric probe plud software. The created profile is for the monitor only and must never, in any case, be used either as input profile or output profile.
- Under Windows, MacOS or Linux, a software like DispalGUI from Argyll, combined with a probe of quality, even old (e.g. the DTP94 probe I own, and for which it doesn't exist any more [??] drivers for Windows) give very good results ; the processing time is quite long (about an hour).
- RawTherapee automatically detects the system profile, however you can enter the screen icc filename in « Preference/ Color Management / Monitor Profile »
- The reader shall preferably have minimal knowledges about colour management : matrix triplet, RGB, XYZ, Lab, color space, primaries and colorimetric profile... wise readers can read the B. Lindbloom's website [1]
- The histogram display as well as the browser can be configured: by default, the displayed values take into account the "Output profile". You can change this behaviour going into "Preferences" and checking "Use working profile for main histogram and navigator"
- Of course, this document is far to be exhaustive, the subject is complex.
Initial raw processing before RGB conversion
Read the raw file and use its data
- Le first step that is essentially carried out on a Dcraw basis (thanks to D.Coffin) consists in reading all types of raw files, with their proprietary coding: data depth, 12 or 14 bits, sensor saturation, white balance, ... and of course rggb or rgbg data;
- the default white balance is the one chosen by the user on his/her camera for the shooting!
- the interpolation (AMaZE, AHD, DCB...) takes place after by rgb data modifying (the image can be visually evaluated on a screen): the interpolation shouldn't modify the colorimetry (or a very few) and that is the case for all the existing interpolations in RawTherapee (deltaE94 due to interpolation is approximatively 1, so negligible), in the other hand, at the limits (upper highlights ...) artefacts may appear for some of them.
- in order to give them a more realistic look, these rgb data are modified by either a colour matrix (from Adobe), or a DCP profile (from Adobe or RawTherapee), or an ICC input profile, we will below come back about these ICC profiles, their elaboration and use;
- rgb values are without any colour space - this point is essential (the choice sRGB or AdobeRGB for example suggested by the camera is for JPG files sonly)
- the colour management is processed: a) partially with LCMS2, that made great improvements, and can now work using floating point avoiding colours cliping; b) directly by computing (conversion of XYZ, Lab, RGB, gamma, etc.)
ICC input profiles : elaboration, use, gaps
- these profiles apply either like external profiles after RGB conversion (as does Capture NX2) to the rgb data, so theoretically without rendering intent (relative, absolute, perceptual, saturation). They modify Lab values but not rgb ones - histograms remain the same, or like internal profiles as does RawTherapee (theoretically without rendering intent);
- they try to reduce the gap between their original values (the sensor ones) and a target value, theoretically perfect;
- they are theoretically matching: a given illuminant (D50, C, shadow,...), test pattern shooting conditions, lens shooting...
- nevertheless, we can without any problem, use them as long as we stay approximatively in the same environment, e.g. flash instead of daylight, D55 instead of de D50...
- elaboration :

- shoot a test pattern in ideal conditions matching the planned use (outside, studio, ...);
- the wider the test pattern gamut is, the better the result is, e.g. the ColorChecker24 is close to sRGB, even if it gives good results in usual cases, how could it efficiently evaluate real colours that are out sRGB range (flowers, artificial colours ...)?
- the higher is the test pattern cells number, better the result is (better profile guiding)
- The 468 colours test pattern, designed with a colleague "Rouli", is over WideGamut for some colours, and owns low luminance values.
- for your information, about my D200, deltaE94 results gotten from my 468 colours test pattern shoot (NEF) on which I apply the input profile or matrix: a) original colour matrix (Dcraw) – (or results obtained with Camera Raw 6.6 and DCP) profile): average=4.37, standard deviation=1.82, maximum=13.75 ; b) ICC profile, stored in the "Iccprofile" folder, elaborated from the ColorChecker24 close to sRGB: average==3.66, standard deviation=2.08, maximum=11.28; c) ICC profile, elaborated by myself from the 468 colours test pattern with very wide gamut, close to WideGamutRGB: average==2.05, standard deviation=1.44, maximum=8.8; d) of course, most of the time, the profile made with a ColorChecker24 (ICC or DCP) wil be enough!
- shoot the test pattern at about 12 o'clock in direct sunlight (a), or in cloudy weather (b), or in the shadow (c), or with tungsten light (d), or with a Solux studio light (e) that has a spectre very close to the daylight, or (f) another light that match your needs:
- set the camera in manual mode (exposure...);
- set the white balance on a) 5000K (or similar to "sunlight"); b) 6000K; c) 8000K; d) tungsten 2850K; e) Sun 4700K; f)... ;
- ensure there is no reflect;
- take several photos each 1/3 EV;
- ensure the most perfect possible exposure equality between the test pattern centre and four sides.
- save the raw files in a folder called RawTherapee
- open the raw with the "neutral" pp3 profile et choose "Prophoto" as "working profile", in "Input Profile", choose "No profile"
- evaluate the exposure from one of the test pattern grey cell which luminance lie between L=40 et L=60 and study the exposure difference between the test pattern dark sides; choose the shoot with the best compromise; do the shoot again if necessary.
- set the exposure with "raw white-black point" - "white point: linear corr.factor" ensuring that "White point HL preserving corr(EV)" is set to zero, in such a manner that the L value of the grey reference cell being the closest possible of the reference.
- tweak the white balance with SpotWB, choosing a grey cell (20 < L < 80) of which the "a" and "b" values are the closest to zero (for this operation the "a" and "b" values must be inferior to 0,5; otherwise, if the cell has "a" and "b" values close to 1, tweak with the "temperature" and "hue" sliders (see below the notes about white balance) in such a manner to arrive to the reference cell Lab values.
- then click on "Save reference image for profiling"
- use your "profiler" which will use, according to the maker, either the spectral values or the Lab or XYZ values: generate a reproduction type profile for the illuminant matching the shooting (D50, D65, Solux, etc.).
- of course, some « profilers » (Profilemaker5, etc.) allows to elaborate profiles that are not « reproduction » profiles that minimise the deltaE94, but profiles that will give a specific rendering (portrait, landscape, etc.) by acting on the contrast curve and on the differentiated chromaticity between pastel and saturated tones. These profiles are working, but in my point of view, are out of RawTherapee's mind by introducing from the processes beginning, hue and contrasts gaps that can't be corrected any more by the various algorithms. Nevertheless, this choice is possible.
White balance
White balance gaps
- The white balance is really operational only with the use of "SpotWB" on a perfect grey ("a" and "b" Lab values set to zero), but as it is quasi impossible to put a grey chart on each shot (otherwise to do it like Alfred Hitchcock), if you want to tweak the camera white balance, you have generally to use the "Temperature" and "Tint" sliders;
- But the sliders have a range from 1500K to 25000K, and the used computing basis matching the D illuminant (Daylight) is not valid under 4000K (computing is only an extrapolation)
- Moreover, data become false if the illuminant is different from the day light (D), for example the illuminant "Blackbody" or "Fluorescent"
- Then, show caution, great caution, when you are out of the D illuminant (daylight) and for temperatures under 4000K

Principles
Shooting: When shooting, two basis options are available to the user: a) To work in raw mode, in this case, mistakes are authorized and a retouches are possible with a raw processing software, for example RawTherapee; b) to work in JPEG mode, in this case, if the white balance choice on the camera is different that the real light conditions, the retouch is more difficult. We will give more importance to the raw mode study.
However a camera owns (essential for JPEG, useful for raw) several white balance settings. Of course theses functionalities vary from a model and maker to one another, but we often find:
- An "auto" mode: the camera electronic decide which value is right from home-made algorithms. This mode generally works pretty well, except when there is strong dominant colours.
- A "manual" mode where the user, for some brands, enters a temperature value, e.g. 7000K. This choice is made by a confirmed user, on his/her experience basis.
- A "pre-set" mode where the user can choose amongst several situations predetermined in "the factory": "sun", "shadow", "cloudy", « flash », « incandescent », « fluorescent »,...
- Note: each brand and model has its own specificities, e.g. for the fluorescent mode: a) Canon equips its cameras with only one mode; b)Fuji gives 3; c) Pentax gives 3 ;d) Nikon gives up to 7 (D3S, D300,...); e) etc.
- Note also: the "flash" value differs from one brand to another one, e.g. for: a) Nikon D300, the flash illuminant matches roughly 6400K; b) Leica R9, the flash illuminant matches roughly 5500K; c) Sony A900, the flash illuminant matches roughly "shade", that means about 7000K...
- of course in most of the cases, the choice of pre-set is pretty obvious, but in some other cases the user won't know what to chose... Indeed, during an exhibition, a visit to the museum, etc. what is the lighting in use ?
- All these settings act on the channels multipliers;
- At the end, during a raw processing, this choice will be displayed in RawTherapee as "Camera".
Raw processing
RawTherapee allows 5 possibilities:
- « Camera » : the software uses - when existing - the shooting EXIF data
- « Auto » : the software values the white balance at the "average" data on a theoretical neutral grey basis;
- « pre-set settings »: like Shade, Daylight, Fluorescent, etc.
- « Custom »: the user can choose Temperature and Tint (see the section White balance gaps)
- « Spot WB »: the user choose a neutral-grey area as a reference. This almost means a neutral-grey chart must be present when shooting.
Coloured object – illuminant – observer
Simplifying, colorimetry can be synthesised in three kinds of data:
- Coloured object: characterized by its pigments (red, blue,...) whatever the lighting source is. It can be evaluated with a spectrometer, that will give an unique representation of it
- Illuminant or Lighting source: this data characterize the nature of the illumination source (sun at noon, shade, flash, tungsten, fluorescent...). It is valued by two data: its spectral power distribution and its correlated temperature; caution! two lighting sources that have the same temperature are not identical because their spectral data are different.
- Observer: Do the following test, observe the colour of a painted wall, then the one of the sample that was used to make the choice, you will notice that the colour feeling is different. CIE (Commission Internationale de l’Éclairage) defined two "observers", 2° and 10°, characterized by the angle under which the colour is observed.
To compute the values observed from a coloured object, under the X illuminant, it is necessary to take into account in the computing the object, illuminant and observer spectral data. These values XYZ are specific to the illuminant temperature (e.g. 6500K); at a software level, (Photoshop, RawTherapee...) the standard is D50. So, it is imperative to proceed to a chromatic adaptation from the XYZ values (illuminant) to the XYZ (D50). For that, several methods exist from the less to the most efficient: Von Kries, Bradford, CIECAM02.
The Daylight illuminant
This illuminant has been object of many studies by Judd, MacAdam and Wyszecki, from several hundreds of examples. In short, the "D" illuminant is the sum of three parts: S(lamda)=S0(lamda) + M1*S1(lamda)+M2*S2(lamda)
- one "fix" part, So that is the average of all the tested examples;
- one first "variable" part, S1 that matches the "blue/yellow" variations due to the presence or not of clouds or to the position and the intensity of the direct sun;
- one second "variable" part, S2 that matches the "pink/green" variations due to the presence of humidity in the form of vapour or fog ...;
- in practical terms, that can be written in a "simple" formula that determines two values x_D and y_D on a temperature and an illuminant basis
- x_D=0.244063 + 0.0991*103/T+2.9678*106/T2 -4.6070*109/T3 for 4000K < T < 7000K
- x_D=0.237040 + 0.24748*103/T + 1.9018*106/T2 -2.0064*109/T3 for 7000K < T < 25000K
- y_D = -3.0*x_D2 + 2.87*x_D-0.275
- these formulas are used to calculate the parameters M1(x_D,y_D) and M2(x_D,y_D) of S(lamda)=S0(lamda) + M1*S1(lamda)+M2*S2(lamda) – it was not the case so far in RawTherapee. Previously, in RawTherapee, the xD and yD values were directly used to calculate the channels multipliers, now, these values are used to determine the illuminant spectral values at the T temperature. It is only later on that second values are calculated that allow to determine the multipliers.
Two things can be immediately noticed:
- it does not exist any "Daylight" reference under 4000K, the previous formula used in RawTherapee (from 1200K to 4000K) has been "invented" for Ufraw;
- nothing prevents to modify RawTherapee to switch the maximum value from 12000K to 25000K (done since 2013)
"Blackbody" illuminant and "A: tungsten"
The A illuminant from CIE is used to represent the typical light of a domestic bulb tungsten filament. Its relative spectral power distribution is the one of a Planck radiator at an approximative temperature of 2856K. The A illuminant from CIE can be used in any colorimetry application involving the use of an incandescent light, unless there is specific reasons to use another illuminant.
The "Blackbody" illuminant can be caculated with the Planck formula that is the generalisation of the illuminant on a T basis:
- S(lamda)= c1 * pow(wavelength, -5.0)) / (exp(c2 / (wavelength * blackbody_Temp)) – 1.0);
where the 2 values c1 and c2 match to: a) c1=2*Pi*h*c2 h=Planck constant c=light velocity ; b) c2=h*c/k k=Boltzmann constant
This illuminant correctly joins up at roughly 4000K with the " Daylight" illuminant with minimal gaps. I accordingly chose for RawTherapee to use the "Blackbody" illuminant under 4000K and up to 1500K (it seems that "ACR" did the same choice).
The Fluorescent illuminants
Standardisation has foreseen 12 illuminants of his type, matching the lighting tubes sold in the shops:
- F1 : Fluorescent daylight – 6430K
- F2 : White fluorescent cold – 4230K
- F3 : White fluorescent – 3450K
- F4 : White fluorescent warm – 2940K
- F5 : Fluorescent daylight – 6350K
- F6 : White luminous fluorescent – 4150K
- F7 : D65 simulator – 6500K
- F8 : D50 simulator – 5000K
- F9 : White cold deluxe – 4150K
- F10 : Philips T85 – 5000K
- F11 : Philips T84 – 4000K
- F12 : Philips T83 – 3000K
These illuminants (see white balance gaps) have a very different spectral power distribution between them and between the "daylight" and "blackbody" illuminants. So it is not advised to replace - when a lighting is fluorescent - the illuminant in question (e.g. F11 4000K) by an equivalent "Daylight 4000K".

Actually, the white balance calculates on the spectral data basis, two coefficients xD, yD that modify the channels multipliers: this calculation acts as an averaged integral calculus. Indeed, the "average" white balance will be exact, but the spectral data peaks or gaps, compared with a theoretical ideal (blackbody or daylight) will locally bring, for some colours, hue gaps more or less important.
It exists a concept called "CRI = Color Rendering Index" that translates the lighting source quality. This "CRI" is a number equal to 100 for a perfect source. We consider that values over 90 give good results. e.g.:
- Fluo F4 "warm white": CRI=51
- Clear Mercury Vapor: CRI=17
- several LED with "CRI" between 50 and 96
- Solux 4700: CRI=92
- etc.
This concept is embedded (not used yet) in RawTherapee with the following choices:
- 20 reference colours of which, 8 "standard" from the Colorchecker24, 4 skin hues, 4 greys (white-black), 3 blues
- use of CIECAM02 for the chromatic adaptation
- use of CIE Lab for deltaE calculation
To remedy it (partially) it is enough to create an input profile with the desired lighting source and the matching spectral data.
Other illuminants
Other illuminants exist, stemmed from the A illuminant and close to "Daylight"
- B and C that I did not embedded in RawTherapee, but it is possible to do it
- an illuminant with equal energy: "E"
- The studio bulbs illuminants (movies, stage lighting, museums, photo studio, etc.) that are named HMI, GTI, Solux 4700K , JudgeIII, Solix4100K, Solux3500K, etc., they are embedded in RawTherapee.
- The LED illuminant, these lamps often have large gaps in the blues. Some of them own very satisfactory features
- "Proprietary" flashes illuminants (Canon , Nikon, Pentax...) and studio flashes illuminants, they are generally very close to daylight, but each one at different temperatures. I did several grouping at 5500K, 6000K et 6500K, about studio flashes, it should be useful to have their features: a) theoretically it should be useful to have the spectral data for each flash (I don't have them), moreover, these data vary depending on the flash power ...; b) so, I preferred to use the equivalent "daylight".
As we can see, the situation is not simple and pose many problems to the raw processing software, of which RawTherapee.
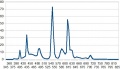
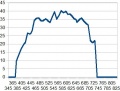
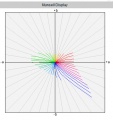
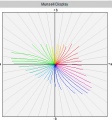
Illuminants Diagrams and Colour Rendering Index (CRI)

Illuminant D50 (CRI=100 Sigma=0)

Illuminant A 2856K (CRI=100 Sigma=0)
Illuminant D150 -15000K (CRI=100 Sigma=0)

Illuminant Fluo F1 "daylight" 6430K (CRI=77 Sigma=10)

Illuminant Fluo F2 "coolwite"4230K (CRI=64 Sigma=12)

Illuminant Fluo F3 "white" 3450K (CRI=60 Sigma=12)
Illuminant Fluo F4 "warm white" 2940K (CRI=54 Sigma=11)

Illuminant Fluo F5 "daylight" 6350K (CRI=74 Sigma=12)


Illuminant Fluo F6 "Lite white" 4150K (CRI=61 Sigma=13)

Illuminant Fluo F7 "D65 simulator" 6500K (CRI=90 Sigma=2)
Illuminant Fluo F8 "D50 sylvania F40" 5000K (CRI=94 Sigma=1.4)
Illuminant Fluo F9 "Cool white delux" 4150K - 4330K (CRI=89 Sigma=2)

Illuminant Fluo F10 "Philips TL85" 5000K (CRI=72 Sigma=11)
Illuminant Fluo F11 "Philips TL84" 4150K - 4000K (CRI=77 Sigma=9)

Illuminant Fluo F12 "Philips TL853" 3000K (CRI=72 Sigma=8)
Illuminant Lamp HMI 4800K (CRI=97 Sigma=1)


Illuminant Lamp GTI 5000K (CRI=90 Sigma=2)

Illuminant Lamp Judge III 5000K (CRI=92 Sigma=2)

Illuminant Lamp Solux 3500K (CRI=95 Sigma=2)

Illuminant Lamp Solux 4100K (CRI=92 Sigma=2)
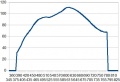
Illuminant Lamp SoluxNG 4700K - 4480K (CRI=97 Sigma=1)

Illuminant Lamp LED LSI Lumelex 2040 - 3000K(CRI=90 Sigma=2)
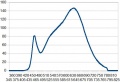
Illuminant Lamp LED CRS SP12 WWMR16 - 3050K(CRI=94 Sigma=3)


Algorithm
I use the basic algorithm "Daylight": a) calculation of the x_D and y_D values that are given as parameters to M1 and M2 (S(lamda) = S0(lamda) + M1*S1(lamda) +M2*S2(lamda) from which we differentiate Xi,Yi,Zi by matrix calculation [XiYiZi]=[observ2°xyz][S(lambda)], then we calculate the channels modifiers modifications by a simple matrix calculation [mulrgb]=[sRGBd65_xyz]*[XiYiZi] (lebarhon: no b)!)
- I used works of John Walker (public domain), and B.Lindbloom - increasing the accuracy and the spectral range - mostly the "Spectrum_to_xyz" function, as known as "CIE_colour_match" that converts spectral data (350 – 830nm) of a colour or an illuminant into xBar, yBar, zBar values (via the Observer 2° data). We get the output values x and y.
About the blackbody, I use the Planck formula: the seem between the two formulas is very good with a very slight gap of the xD and yD values at 4000K (that we can make out with the histogram between 3995K and 40005K): a) daylight 4000K: xD=0.382 yD=0.383 (for your information for 4500K : xD=0.362 yD=0.370, for 7000K xD=0.30 yD=0.32, for 25000K xD=0.25 yD=0.25); b) blackbody 4000K: xD=0.381 yD=0.377;
For the other illuminants, the works I previously did on the calibration (test pattern 468 colours) led me to search for (and find out) the illuminants spectral data I selected (tungsten, fluorescents, HMI, GTI, Solux, etc.)
rgb ==> RGB conversion - Working space "Working Profile"
This "conversion" converts rgb data (without colour space) into the working space chosen by the user.
These working spaces are 8 of them (which sounds more than enough, or even too much...): sRGB, AdobeRGB, Prophoto, Widegamut, BruceRGB, BetaRGB, BestRGB, Rec2020. amongst these 8 profiles, 5 have a wide gamut: BetaRGB (origin B.Lindbllom), BestRGB, Rec2020, WideGamut and Prophoto.
During this conversion, an internal gamma is set by RawTherapee that always is "gamma sRGB" i.e. "gamma=2.4 and slope=12.92" (like Lightroom, see later on)
Note that other software made other choices:
- Adobe with ACR suggests 4 choices (AdobeRGB, ColorMatch, Prophoto and SRGB)
- Adobe with Lightroom: no choice, but a modified Prophoto space with a sRGB gamma (Melissa)
- DxO: no choice, but a Adobe space
- NX2: choice in the available output spaces
Which one to choose ? Wide ranging debate where small spaces supporters conflict with wide spaces ones... between data lost and false or imaginary data. Indeed, the widest space (Prophoto) houses, by construction, invisible or even imaginary colours. Moreover, in the blues area, it may under some circumstances, generate artefacts.
A good colour space would have a shape taking into account the gamut that minimize the waste of space... which means the space should be chosen depending on each image, a too wide space could be generating unsaturated colours in extremes cases (in the working profile, but which will be reproduced during the output conversion ...). Nevertheless, theoretically, the colour management must make this choice tranparent.
My answer is pragmatic, choose the space that match the best! but, on what basis ?
- Do you make essentially prints with a printer that use a CMYK driver? In this case it is not really useful to choose a wide gamut profile.

- Do you make prints with a high quality ink-jet printer? In this case, it is better to choose Prophoto (this kind of printers have a gamut, that for some colours, is wider than WidegamutRGB), as working profile, but also as output profile, and of course to choose the right printer profile... on this graphic, we can see the gamut of a) 3 usual colour spaces (sRGB in blue, AdobeRGB in pink, WideGamut in yellow), b) the ICC profile ffor my D200 in grey, c) the Epson printer profile and its "3800MOABKOKOPELI_2431_V4" wide gamut paper.
- Do you have a very high quality monitor which has a gamut close to AdobeRGB or WideGamutRGB, in this case take a wide gamut profile.
A pretty simple way to evaluate the minimum profile is to use the statistics given by "vibrance" in debug mode (with verbose=true). In the RawTherapee.exe window you will see a message:
- Gamut : G1negat=x iter - G165535= y iter - G2negat= z iter - G265535= w iter
- if a value (x or y) over 0 appears for one of the two G1, that means the initial image (with the controls made before: contrast, exposure,...) exceed the chosen space gamut in the working profile.
- if a value (z or w) over 0 appears for one of the two G2, that means the saturation set by "vibrance" exceeded the gamut.
- It is up to you to choose if you want to keep these values (see above) or to put them into the gamut (vibrance do it for you, as well as "avoid colour cliping" + "enable saturation limiter"), but you 'lose' colours!
- the conversion rgb==>RGB allows when working in "float" to preserve the essential negatives and over 65535 values.
Work in the colour space chosen by the user (working space "Working Profile")
RawTherapee made the good choice to work in Lab mode (or its flavours Luv or Lch) or in CIECAM02 mode and with real numbers. This allows to preserve the best colours and gamut.
Functions available in "Exposure" does not modify the hue, except "Saturation" that make it by dysfunction of the Lab mode (see about that the Munsell correction section
Same thing for "Lab adjustments", for the "Saturation" slider, along with the "a" and "b" curves and all the curves that control the chromaticity.
"Channel Mixer" and "HSV equalizer" modify strongly the colorimetry, to be used with all the knowledge of the consequences on the colorimetry. The functions: contrast, brigthness, tone curve,..may quite strongly modify the gamut (see above the control with the statistics given by "Vibrance")
What happens when we are in a "Working Profile" or when we change of "Working Profile" or the settings?
When we are in a narrow profile like sRGB, it may seem obvious that the colours will be limited to this profile limits! So, if an initial colour (the sensor one, slightly modified by interpolation) is inside sRGB, what happens when we tweak sliders and curves?:
- in RGB mode (Exposure), if saturation or lightness or contrast is/are modified, we work in rgb mode or its linear derived "hsv". This means that the resulting effects will depend on the working space ((sRGB, AdobeRGB, Prophoto), the results will be different when we move from "sRGB" to "Prophoto", even if we stay inside the gamut limits.
- in Lab mode, if lightness, chromaticity, contrast or curves are modified, we modify directly the L, a, b, (or C,h) values. This means that if we stay inside the gamut limits, the image will be the same (within the limits of the colour management)
When exceeding the gamut - that is, the original image - either acting the sliders or the curves, what happens?
- let's take an example, an original colour is L=27 a=2 b=-75; this colour is in the Prophoto space and is worth R=42 G=52 B=158, and in sRGB R=-85 G=69 B=184 (negative R means out of gamut). If we change the working profile, it is obvious this colour can't be restored; the XYZ conversion will give L=32 a=21 b=-67 and R=0 G=69 B=184. The colour will have a different aspect because it is completely impossible to reproduce it in a smaller colour space.
- second example, a colour inside sRGB : L=40 a=42 b=-44, that is in RGB (sRGB) R=133 G=66 B=166, and in RGB(Prophoto) R=102 G=64 B=140: a) if we apply saturation (+30) in exposure, the values become - Prophoto - L=36 a=49 b=-49 and sRGB L=38 a=47 b=-47, because we act on the RGB values; b) if we apply chromaticity in Lab adjustments; Lab values become L=40 a=55 b=-58 as well in sRGB than Prophoto, because we stay inside the sRGB gamut; c) if we choose a colour, close enough to the sRGB gamut limits, but inside the gamut: L=40 a=63 b=37 and we apply chromaticity +30, Lab values become - Prophoto L=40 a=81 b=49 - we can notice that the hue is preserved (arctg(b,a)), and in sRGB L=44 a=69 b=50 – the hue isn't preserved.
What does "Avoid colour shift"?
If we apply to c) above, "Avoid colour shift", the system will try to preserve the hue, by applying a relative colorimetry Lab values become L=40 a=65 b=38 (which leads to the RGB channel G=0).
"Avoid colour shift" realises two things:
- try to put in the working profile gamut data out of this gamut, giving priority to a relative colorimetry. RGB negatives values are detected and the chromaticity (and luminance as well) are modified to reach the value 0.
- apply a "Munsell" correction.
The "Munsell" correction
Goal: to give the user possibility to automatically correct the colours that are sometimes false in Lab mode when modifying the saturation, mostly in the blues-crimsons, reds-yellows and the greens (Munsell type correction)
This goal needs the creation of 160 LUTf:
- these LUTf give to each colour (in Munsell sense), each luminance, hue values on a chromaticity basis: 2, 3 or 4 points are set for chromaticities [0..180] from 5, 45, 85, 125 or even 139 when possible. Intermediate values are linearly interpolated. These LUT cause a minimal memory occupation: each one has between 45 and 140 entries, that means about 16000 entries at the total...
- the LUTf are realised for four critical areas, where the drift compared with the Lab mode is important (blue-crimson, red-yellow, green, red-crimson), for the other areas the gaps are low, in any cases very much under the matrix and ICC profiles possibilities.
- these LUTf have the C illuminant as basis (slightly different of D50 or D65), but due to the fact that we work on a gap basis and not on absolute values, the calculation error is very low (less than 1% of the correction, in any cases very much under the matrix and ICC profiles possibilities).
- theses corrections are quick, nevertheless they are increasing the "vibrance" or "Lab adjustments" processing time of about 10%.
- if "verbose" option is enabled, we can see appear for each correction type, the concerned number of pixels and a rough idea of the correction size (in radians). For correction values in radians, the colour gap in deltaE94 is the following:
- correction=0.4 rad deltaE94=12 for blue-crimson
- correction=0.2 rad deltaE94=8 for red-yellow
- correction=0,1 rad deltaE94=3,7 for green
- correction=0.05 rad deltaE94=2 for red-crimson
- the maximum common values of the drift can reach about from 0.05 radian to 0.15 radian for average modifications of saturation, values from 0.2 to 0.25 radian are not exceptionnal.
- for information, a deltaE94 less than 1 is negligible, it is noticeable around 2 or 3 and very important at 8 or 11.
Colours drifts representation for L=20
Colours drifts representation for L=40

Colours drifts representation for L=70


Output space "Output Profile"
Space choice
The first thing to examine is: what are the output profiles that are installed on your computer? This depends of: a) the operating system (on the face of it, Linux does not install any profile); b) the other graphical software that are installed (Capture NX2, PhotoShop CS, DxO, etc.), each one install proprietary profiles, for example NX2 installs some NKsRGB.icm NkAdobe.icm, etc. that are copyrighted...; c) profiles that you can have downloaded on the web, for example on the Adobe or B.Lindbloom websites.
On principle I would recommend to check the installation or to install the output profiles matching the working profiles - that are *.icm or *.icc files physically present on your computer and that have nothing to do with the calculation matrix of "iccmatrices.h". If these files are missing, TIFF or JPEG output cannot be done towards these profiles, but will be by default (if the RT_sRGB.icm file is present) done towards the SRGB output space.
These profiles have the following names (we can find others that have the same features or close features), they are generally copyrighted and consequently cannot be shipped with an Open Source software without authorization. They are available on the Web: ProPhoto.icm; SRB Color Space profile.icm ; AdobeRGB1998.icc; BestRGB.icm ; BetaRGB.icc; Bruce.icm; WideGamutRGB.icc. Of course you can install some others like CIE.icc ; Colormatch.icc; etc.
They must be installed in the RawTherapee "Iccprofiles/output" folder or in \windows\system32\spool\drivers\color for Windows and /usr/share/color/icc for the other systems.
When you choose an output profile, e.g. AdobeRGB1998 and the working profile Prophoto, LCMS2 will convert with a Colorimetric intent (chosen by default in the RawTherapee options: relative, perceptual, ...) the RGB data from the working space to the output space.


Gamut for a luminance L=5

Gamut for a luminance L=25

Gamut for a luminance L=75

Gamut for a luminance L=95


Of courses, remarks about the choice of the output colour space are similar to the ones about the working space (print, screen,...).
It you want to print with a high quality ink-jet printer (remind: RawTherapee has no print module so far), you have to use a third party software (Photoshop...), in this case I strongly recommend an output profile of Prophoto or WideGamut type.
Take care however, JPG outputs, therefore 8 bits, are almost incompatible - important risk of posterization - with wide gamut spaces (Prophoto, WideGamut...).
Shipped files
Because of the copyrights, I shipped specific files with more detailed LUT that should bring less posterization in the shadows. These files are a by-product of Output Gamma (see below)
- RT_sRGB.icm: similar (primary) to sRGB.icm standard with internal gamma close to sRGB: g=2.40 slope=12.92
- RT_sRGB_gBT709.icm: similar (primary) to sRGB.icm standard with internal gamma BT709: g=2.22 slope=4.5
- RT_sRGB_g10.icm: similar (primary) to sRGB.icm standard with internal gamma linear: g=1.0 slope=0
- RT_Middle_gsRGB.icc: similar (primary) to AdobeRGB1998.icc standard with internal gamma close to sRGB: g=2.40 slope=12.92
- RT_Large_gsRGB.icc: similar (primary) to ProPhoto.icm standard with internal gamma close to sRGB: g=2.40 slope=12.92 (close to "Melissa" used by Lightroom)
- RT_Large_gBT709.icc: similar (primary) to ProPhoto.icm standard with internal gamma BT709: g=2.22 slope=4.5
- RT_Large_g10.icc: similar (primary) to ProPhoto.icm standard with internal gamma linear: g=1.0 slope=0
- Rec2020.icm: new primaries - large gamut - with internal gamma BT709: g=2.22 slope=4.5
RawTherapee gaps
The user can easily note that the output is slightly different from preview. This is not an output default but is due to the curves elaboration that badly take TRC notion into account (ICC profiles embedding to modify from the interior the tone rendering).
It is one of the reasons that led me to give possibility of "adjustable" outputs:
- either by choosing an output profile with another gamma;
- either with an adjustable gamma (gamma and slope);
- either possibly to realise a linear output and adjust it in Photoshop...
- (see further the histograms sketches)
Output Gamma
From my point of view, Output Gamma is one of the key points of a successful TIFF or JPEG output, for several reasons: since the adding of icc/icm profiles above - that are directly derived and elaborate by Output gamma - this option shows a less important interest because the use of these "new" pseudo-profiles Prophoto and SRGB brings similar advantages to Output gamma when selecting the pseudo sRGB and Prophoto ! (see above). This option allows to partially compensate the RawTherapee gap (difference between output/preview)
The ideal would have been to put Output gamma in first process, before the Exposure, Highlights reconstructions, Shadows/highlights, etc. tabs; but, and it is what I thing is a RawTherapee gap, this modification turned out to be impossible without bringing important artefacts: the different RawTherapee pipelines are overlapping and colorimetry in the processing initial part, looks more like do it yourself than professional processing...
I accordingly chose to implant this process in final stage, what is not totally incongruous (even if I think it would be better in initial stage) Output Gamma is going to allow:
- an image evaluation for software without colour management
- an image modification if youy print in CMYK (with of course a third party software).
[Lebarhon: this section is indeed not clear, the writer says firstly "Output gamma is a key point for several reasons", and then "this option shows a less important interest" and where are the several reasons ?]
Some thoughts
The gamma acts in a pretty similar way of a combination between "Exposure curves" + "black point" + "tone curves" present in RawTherapee, but modify in a more radically way the contrast, the histogram repartition, mostly between shades and highlights, by modifying at the same time (what previous functions can't do), the TRC curves of the file headers similar to an input ICC profile. A friend of mine, photographer told me recently: "At the beginning, I thought we could simulate gamma with contrasts and tonal curves... but the result is different".
Why indeed has Adobe, with Lightroom, designed "Melissa" that is a Prophoto colour space with a sRGB gamma, i.e. a linear part until r=12.92 and then a gamma of 2,4?
Why has D.Coffin embedded in Dcraw for a long time ago, a linear gamma and a varying gamma as well?
Theoretically, if the colour management is perfect, whatever the output gamma is (standard, varying...) the image should be identical, because the colour management use Lab (or XYZ) data and what we call PCS (Profil Connexion Space in D50); in practice, the image seems identical, but is we watch in the shades, we can see there are gaps, admittedly pretty low but enough for RawTherapee users could have said: the output image is different from "preview".
In the other hand, for software that does not manage colours like many web browsers (Chrome,...) the output image will depend on gamma; it is then important RawTherapee allow to view what the output file will be (softproofing). Today, several factors must be taken into account:
- working space ("working profile") conversion towards output space (Output profile): it may seem obvious that if the image has colours out of the gamut for one or two of the both spaces, if the spaces range is different, then the image rendering will be different;
- colour management existing or not: in the case of RawTherapee or of an editor that manage colours, the gaps (with identical output spaces) will be low but nevertheless significant; in the case of software that do not manage colours, gamma impact will be very important.
- possibility to configure in the softproofing, the intent and the black point.
- Later on, it must be quite easy possible to simulate a print by converting the output towards the printer profile; note that in this case, a view of the printable colours should be an important plus.
When RawTherapee will have a function similar to Photoshop CS one "proof format- proof colours", the viewing issue of Output gamma will be solved! this function allows the "soft proofing", e.g. to simulate the look a file is going to have in a website or on a CMYK printer.
Various Output Gamma
In the drop down list you have 7 pre-defined gamma:
- BT709: slope=4.5 gamma=2.2
- sRGB: slope=12.92 gamma=2.4
- linear: gamma=1.0
- standard:slope=0 gamma=1.8
- standard: slope=0 gamma=2.2
- High: slope=3.35 gamma=1.3
- Low: slope=6.9 gamma=2.6
BT709 "is better to process shades (they will be less grey) than sRGB and all the more so, 2.2 or 1.8
"Low" will increase the contrast of the quite poor images, and allow a better post processing for over exposed images
"High" at the opposite will decrease the contrast...
Linear: allows a process in Photoshop of very high dynamic images by adjusting RGB curves in Photoshop (difficult exercice...)
Moreover, you have possibility to use "free gamma" that allows to connect any slope and gamma values to a given output profile, so, you can if desired go out of the new outputs connected to the new added profiles icc/icm:
- sRGB with standard gamma 1.8
- WideGamut with gamma BT709
- sRGB with gamma: 2.2 and slope 6.5
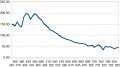
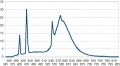
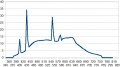
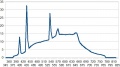
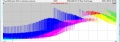
As examples here is with the same NEF file various histograms with various gamma and as a reference the RawTherapee histogram (preview) with the same settings (working spacece Prophoto, profile "neutral", output profile = Prophoto and its varying gamma).


The more the histogram is shifted to the left the more the image appears dark...
Moreover, it is not because the histograms are strictly identical that the images rendering will be identical. Indeed, the "TRC" notion take place as well for the preview as for the output file. This "TRC" acts on the file headers (ICC profile) and modify the tone data. If the "TRC" value of the output file is known for certain, because it is determined by the output file features (Prophoto.icm, RT_srgb.icc,...), I think that it is not the same thing about "preview"... (see further notes about sRGB output).
Some people could be worried, is "RT_SRGB" identical to "sRGB_Color_Space_Profile" and different from the preview. Moreover, what are the effects of another gamma?

Preview en SRGB

Output RT_sRGB

Output sRGB_Color_space_Profile

Output sRGB gamma BT709

Output sRGB gamma=2.3 slope=8


How to use it ?
To satisfy a desire for simplicity, the Output profile will be a derivative of the Working profile, the box Output profile appear in grey. That means Output profile = Working profile.
For instance, you select Working profile = Prophoto and Free gamma = 2.1 and slope =4.0.
Then you validate a TIF output or towards the editor and you generate an output TIF file, with Prophoto profile and gamma 2.1 / 4.0. To open the file in an external editor (e.g. Photoshop CS), it will appear "Prefer the embedded profile: sRGB IEC61966-2.1 (RTH gamma BT709 similar to HP sRGB)" that match to the RT_sRGB_gBT709 profile but with a modification that we will examine further.
Other example, you select Working profile = sRGB and Free gamma=2.3 and slope=10.0, you are going to generate a TIFF with sRGB and gamma 2.3 and slope=10 output. To open the file in an external editor (e.g. Photoshop CS), it will appear "Prefer the embedded profile: sRGB IEC61966-2.1 (RTH gamma BT709 similar to HP sRGB)" that match to the RT_sRGB_gBT709 profile but with a modification that we will examine further.
If you enable the option (Photoshop CS): "Delete the embedded profile", the TIFF file will appear with the new RGB values due to the new gamma and slope values, but the image look will be different (file headers missing).
The algorithm uses the LCMS function "CMSToneCurve":
- the output spaces are computed from their primary (red, green, blue), e.g. for Prophoto : p1=0.7347; p2=0.2653; p3=0.1596; p4=0.8404; p5=0.0366; p6=0.0001;
- the gamma parameters are computed with the "calcgamma" function that will, accordingly with the gamma and the slope, determine 5 parameters to give to the LCMS2 right function.
So, we create a pseudo-profile, kind of RGB "Prophoto" and with a gamma matching the selected one.
But we find here, a LCMS2 gap, which creating this profile, does not write the matching profile in the file header, because it works with RGB values and not with LUT / Lab. Theoretically, it should need as much profiles with an adapted gamma and not only one. In practice, I brought a large modification to Output Gamma and worked around the LCMS2 gap, by applying - after the RGB conversion, a profile *.icc that has the same features that the *.icc or *.icm profiles used by Output Gamma but where the rTRC, gTRC, bTRC tags are computed with "calcgamma".
To improve the understanding of the TIF processing in linear mode, you can read the Dcraw tutorial from Guillermo Luijk http://www.guillermoluijk.com/tutorial/dcraw/index_en.htm
From which the necessity to have in the "Iccdirectory" folder, the "*.icc" and "*.icm" files: BestRGB.icm ; BetaRGB.icc; Bruce.icm; WideGamutRGB.icc, (and thus the icc/icm files added for the pseudo-Prophoto , Adobe, SRGB in "Iccprofile/output").
RawTherapee profiles quality
The user can ask himself with reason what is the RawTherapee profiles validity (RT_sRGB, RT_Large,...)?
These profiles have the same features that the "original" ones (AdobeRGB1998, Prophoto, SrGB Color Space Profile), there is only small differences at the primaries and/or white point level. They do not have any incidence on output quality and level.
In the other hand, TRC have more detailed LUT going from 1024 points to 4096 points. This has for consequence - in the sRGB case that is the more frequent output - a histogram with much less fish bones that may bring posterization in the shades. Here is for comparison with the same image, a 16 bits histogram enlargement in low lights, between sRGB Color Space profile and RT_sRGB
partial 16 bits histogram sRGB_color_space_profile

partial 16 bits histogram RT_sRGB