Noise Reduction: Difference between revisions
(Done) |
No edit summary |
||
| Line 6: | Line 6: | ||
Photography is based on recording light which falls on a medium during an exposure. The medium is typically film or a digital sensor. The light signal ''recorded'' on the medium is not an ideal representation of the signal which ''fell upon'' that medium - these differences constitute noise. Film and digital photographs alike are susceptible to noise (called "grain" in film), however there are various types of noise from various sources specific to each medium. | Photography is based on recording light which falls on a medium during an exposure. The medium is typically film or a digital sensor. The light signal ''recorded'' on the medium is not an ideal representation of the signal which ''fell upon'' that medium - these differences constitute noise. Film and digital photographs alike are susceptible to noise (called "grain" in film), however there are various types of noise from various sources specific to each medium. | ||
In order to effectively deal with mitigating noise it is useful to understand what types of noise exist and where they come from. The topic of noise is well explained in this paper by one of RawTherapee's developers and physics professor at the Enrico Fermi Institute | In order to effectively deal with mitigating noise it is useful to understand what types of noise exist and where they come from. The topic of noise is well explained in this paper by one of RawTherapee's developers and physics professor at the Enrico Fermi Institute, Emil J. Martinec: | ||
[ | [http://rawtherapee.com/mirror/noise/ Noise, Dynamic Range and Bit Depth in Digital SLRs] | ||
Light consists of packets of energy called photons. A [https://en.wikipedia.org/wiki/Image_sensor digital sensor] comprises of millions of light-sensitive elements called ''photosites'' (also known as ''sensels'' - sensor elements). Each photosite is capable of recording a signal from a certain range of photons - too few and the photosite will not register anything; too many, and the photosite will "clip" to pure white (completely overexposed). Think of it as a bucket collecting water - despite there being moisture in the air, if it doesn't rain then the bucket is empty, but if it rains too much then it overflows. | Light consists of packets of energy called photons. A [https://en.wikipedia.org/wiki/Image_sensor digital sensor] comprises of millions of light-sensitive elements called ''photosites'' (also known as ''sensels'' - sensor elements). Each photosite is capable of recording a signal from a certain range of photons - too few and the photosite will not register anything; too many, and the photosite will "clip" to pure white (completely overexposed). Think of it as a bucket collecting water - despite there being moisture in the air, if it doesn't rain then the bucket is empty, but if it rains too much then it overflows. | ||
| Line 19: | Line 19: | ||
* Sensor read noise and thermal noise are best handled by the [[Dark-Frame]] tool. | * Sensor read noise and thermal noise are best handled by the [[Dark-Frame]] tool. | ||
* Salt and pepper noise (sudden white or black pixels) is best handled by the [[Preprocessing#Hot.2FDead_Pixel_Filter|Hot/Dead Pixel Filter]] and by [[Impulse Noise Reduction]]. | * Salt and pepper noise (sudden white or black pixels) is best handled by the [[Preprocessing#Hot.2FDead_Pixel_Filter|Hot/Dead Pixel Filter]] and by [[Impulse Noise Reduction]]. | ||
* Pattern noise (periodic, anisotropic) is best handled by the [[Line Noise Filter]]. | * Pattern noise (periodic, anisotropic) is best handled by the [[Preprocessing#Line_Noise_Filter|Line Noise Filter]]. | ||
Regardless the source, noise will manifest itself as blotches of deviating color - "chrominance noise", and deviating brightness - "luminance noise". | Regardless the source, noise will manifest itself as blotches of deviating color - "chrominance noise", and deviating brightness - "luminance noise". | ||
| Line 26: | Line 26: | ||
<div align="center"> | <div align="center"> | ||
<gallery caption="Examining Noise" mode= | <gallery caption="Examining Noise" mode=nolines widths=600px heights=450px> | ||
File:noise-wall.png | File:noise-wall.png|A noisy test photo taken at ISO 6400. | ||
File:Noise-wall-demosaic-amaze.png|AMaZE demosaicing leads to small maze-like patterns. | File:Noise-wall-demosaic-amaze.png|AMaZE demosaicing leads to small maze-like patterns. | ||
File:Noise-wall-demosaic-lmmse.png|LMMSE demosaicing avoids maze-like patterns while preserving detail. | File:Noise-wall-demosaic-lmmse.png|LMMSE demosaicing avoids maze-like patterns while preserving detail. | ||
| Line 52: | Line 52: | ||
# Increase the ''Detail recovery'' slider until you regain a satisfactory level of detail. | # Increase the ''Detail recovery'' slider until you regain a satisfactory level of detail. | ||
# You may notice some small artifacts remain from the noise reduction process. Use the Median filter to remove them. | # You may notice some small artifacts remain from the noise reduction process. Use the Median filter to remove them. | ||
# While it is generally not recommended to combine sharpening with noise reduction, RawTherapee-5.5 has a "contrast threshold" adjuster in the [[Sharpening]] tool, thanks to which you can sharpen details | # While it is generally not recommended to combine sharpening with noise reduction, RawTherapee-5.5 has a "contrast threshold" adjuster in the [[Sharpening]] tool, thanks to which you can sharpen details while preserving the smoothness of uniform, flat areas. | ||
<div align="center"> | <div align="center"> | ||
<gallery caption="Noise Reduction Step by Step" mode= | <gallery caption="Noise Reduction Step by Step" mode=nolines widths=600px heights=450px> | ||
File:Noise-cactus-1-amaze.png|The noisy image. | File:Noise-cactus-1-amaze.png|The noisy image. | ||
File:Noise-cactus-2-lmmse.png|Changing the demosaicing method to LMMSE eliminates the small maze-like patterns and makes the salt-and-pepper noise more clear. | File:Noise-cactus-2-lmmse.png|Changing the demosaicing method to LMMSE eliminates the small maze-like patterns and makes the salt-and-pepper noise more clear. | ||
| Line 68: | Line 68: | ||
== Interface == | == Interface == | ||
=== General === | === General === | ||
Closely examine large areas of strong saturation with fine detail - such as the pattern on a colored shirt or the petal of a flower - as you switch between the RGB and L*a*b* spaces. | Closely examine large areas of strong saturation with fine detail - such as the pattern on a colored shirt or the petal of a flower - as you switch between the RGB and L*a*b* spaces. | ||
| Line 74: | Line 75: | ||
<div align="center"> | <div align="center"> | ||
<gallery caption="Comparison of Noise Reduction - Color Spaces | <gallery caption="Comparison of Noise Reduction - Color Spaces" mode=nolines widths=600px heights=450px> | ||
File:Noise-handkerchief-1-off.png|The noisy image. Detail recovery will be intentionally left at 0, and chromaticity strength will be intentionally set very high, to emphasize effect. | File:Noise-handkerchief-1-off.png|The noisy image. Detail recovery will be intentionally left at 0, and chromaticity strength will be intentionally set very high, to emphasize effect. | ||
File:Noise-handkerchief-2-luminance-lab-conservative.png|Luminance noise reduction in L*a*b* space, conservative. | File:Noise-handkerchief-2-luminance-lab-conservative.png|Luminance noise reduction in L*a*b* space, conservative. | ||
| Line 103: | Line 104: | ||
=== Luminance === | === Luminance === | ||
[[File:Rt nr luminancecurve books.jpg|thumb|600px|The Luminance Curve was used to completely remove noise in dark areas while fully retaining structure of lighter areas.]] | [[File:Rt nr luminancecurve books.jpg|thumb|600px|The Luminance Curve in RawTherapee-4.1 was used to completely remove noise in dark areas while fully retaining structure of lighter areas.]] | ||
"Luminance control" lets you choose whether you want to manipulate the luminance noise reduction via sliders or a curve. | "Luminance control" lets you choose whether you want to manipulate the luminance noise reduction via sliders or a curve. | ||
| Line 188: | Line 189: | ||
=== Median === | === Median === | ||
[[File:Rt nr median books.jpg| | [[File:Rt nr median books.jpg|600px|thumb|The Median filter in RawTherapee-4.1 was used to eliminate artifacts which fit in a 3x3 window left over from the noise reduction process.]] | ||
Use this filter to remove tiny, sharp-looking artifacts left-over from noise reduction. | Use this filter to remove tiny, sharp-looking artifacts left-over from noise reduction. | ||
| Line 247: | Line 248: | ||
When using the "Luminance only" and "L*a*b*" methods, median filtering will be performed just after the wavelet step in the noise reduction pipeline. When using the "RGB" mode, it will be performed at the very end of the noise reduction pipeline. | When using the "Luminance only" and "L*a*b*" methods, median filtering will be performed just after the wavelet step in the noise reduction pipeline. When using the "RGB" mode, it will be performed at the very end of the noise reduction pipeline. | ||
[[File:Rt nr median zoom books.jpg|thumb| | [[File:Rt nr median zoom books.jpg|thumb|600px|Comparison of noise reduction without and with median filtering, zoomed to 200%. While the filtered image on the right may appear less sharp, notice that the unfiltered image on the left does not really contain any more detail - the noise gives the illusion of sharpness. At the same time, the filtered image when saved to JPEG/92/standard was almost 40% smaller than the unfiltered one (350kB vs 215kB). RawTherapee-4.1.]] | ||
You may wonder what other uses median filtering has apart from the elimination of pixels which strongly differ from their surrounding neighbors for aesthetic reasons. One of these benefits is a reduction in file size when saving to compressed formats such as JPEG and PNG. Median filtering removes variations which you will lose anyway if you downscale the image. You are also likely not to see these variations if you print the image. Removing them using median filtering can reduce the file size by even 40% (tested using JPEG compression strength 92 with "balanced quality" [https://en.wikipedia.org/wiki/Chroma_subsampling chroma subsampling]), so give it a try if output file size is a factor. | You may wonder what other uses median filtering has apart from the elimination of pixels which strongly differ from their surrounding neighbors for aesthetic reasons. One of these benefits is a reduction in file size when saving to compressed formats such as JPEG and PNG. Median filtering removes variations which you will lose anyway if you downscale the image. You are also likely not to see these variations if you print the image. Removing them using median filtering can reduce the file size by even 40% (tested using JPEG compression strength 92 with "balanced quality" [https://en.wikipedia.org/wiki/Chroma_subsampling chroma subsampling]), so give it a try if output file size is a factor. | ||
Finally, the "chroma only" median filter method can be used as a complement to automatic chrominance noise reduction calculation - by reducing sharp outliers it can soften the calculated values, thereby avoiding fading out color detail too much. | Finally, the "chroma only" median filter method can be used as a complement to automatic chrominance noise reduction calculation - by reducing sharp outliers it can soften the calculated values, thereby avoiding fading out color detail too much. | ||
Revision as of 17:46, 4 June 2018
The effects of this tool are only visible at a preview scale of 1:1 or more. Use a detail window (click on the ![]() icon under the main preview panel) to inspect a part of the image, or zoom the main preview to 100% (also called 1:1)
icon under the main preview panel) to inspect a part of the image, or zoom the main preview to 100% (also called 1:1) ![]() .
.
Introduction

Photography is based on recording light which falls on a medium during an exposure. The medium is typically film or a digital sensor. The light signal recorded on the medium is not an ideal representation of the signal which fell upon that medium - these differences constitute noise. Film and digital photographs alike are susceptible to noise (called "grain" in film), however there are various types of noise from various sources specific to each medium.
In order to effectively deal with mitigating noise it is useful to understand what types of noise exist and where they come from. The topic of noise is well explained in this paper by one of RawTherapee's developers and physics professor at the Enrico Fermi Institute, Emil J. Martinec: Noise, Dynamic Range and Bit Depth in Digital SLRs
Light consists of packets of energy called photons. A digital sensor comprises of millions of light-sensitive elements called photosites (also known as sensels - sensor elements). Each photosite is capable of recording a signal from a certain range of photons - too few and the photosite will not register anything; too many, and the photosite will "clip" to pure white (completely overexposed). Think of it as a bucket collecting water - despite there being moisture in the air, if it doesn't rain then the bucket is empty, but if it rains too much then it overflows.
Note that the idea of "pixel" does not exist at this point yet - information from several photosites will later be combined into one pixel during a process called demosaicing. Also note that some sources do write "pixels" when they mean "photosites".
The physical sensitivity of the sensor is constant, however the photographer can amplify the recorded signal by modifying a setting you know as ISO (see the Film Speed article on Wikipedia). Since the signals recorded by the sensor are not perfect, using a higher ISO amplifies not only the desired signal, but also the noise. Sensors are susceptible to noise at every ISO level, however the higher the ISO the more apparent the noise.
There are different tools for dealing with different types of noise:
- The Noise Reduction tool is best at dealing with photon shot noise (Gaussian and Poisson noise) and film grain, and some sensor read noise.
- Sensor read noise and thermal noise are best handled by the Dark-Frame tool.
- Salt and pepper noise (sudden white or black pixels) is best handled by the Hot/Dead Pixel Filter and by Impulse Noise Reduction.
- Pattern noise (periodic, anisotropic) is best handled by the Line Noise Filter.
Regardless the source, noise will manifest itself as blotches of deviating color - "chrominance noise", and deviating brightness - "luminance noise".
- Chrominance noise is endemic to digital images, it is generally unattractive and something you will always want to remove.
- Luminance noise, on the other hand, looks like film grain and can be attractive, so it's not uncommon to want to remove chrominance noise but keep luminance noise.
- Examining Noise

A noisy test photo taken at ISO 6400.

AMaZE demosaicing leads to small maze-like patterns.

LMMSE demosaicing avoids maze-like patterns while preserving detail.

This is what chrominance noise looks like. Luminance detail was obliterated to make the chrominance noise more clear. Notice the color blotches in what should be a smooth wall.

Enabling chrominance noise reduction eliminates the colored blotches.

This is what luminance noise looks like. Chrominance noise was removed to make the luminance noise more clear.

Both chrominance and luminance noise were removed.

Tiny pixel-sized artifacts are left-over from noise reduction.

These artifacts can be removed using the median filter.


Not everyone's requirement for good noise reduction is the same. Some like a completely clean, smooth result, while others prefer to have some grain left over to give the photo a more film-like quality. RawTherapee's powerful Noise Reduction tool caters to all your needs - it lets you eliminate noise while retaining detail. It uses wavelets, a Fourier transform and a median filter to work its magic. Read on to learn how to use it efficiently.
Usage
This section details the order of operations for removing noise.
- Start by ensuring you're using the optimal demosaicing algorithm. AMaZE is recommended for general RawTherapee use, however, when working with very noisy, high-ISO images, it is recommended to use the LMMSE or IGV demosaicing methods instead. AMaZE can lead to tiny maze-like artifacts appearing in very noisy images, whereas LMMSE and IGV are designed to prevent that from happening.
- Check the sharpening tools to make sure that you're not sharpening any fine detail, because your noisy photo has no fine detail! If you're using Contrast by Detail Levels or Wavelets, make sure that the first one or two fine-detail contrast sliders are at 0 to prevent these tools from amplifying noise.
- Zoom into the photo to 100% or more and find an area that has both sharp, in-focus parts as well as large, plain or out-of-focus ones, so that you have a good overview of the effects of the tool.
- Enable the Hot/Dead Pixel Filter if you notice salt-and-pepper noise (black and/or white pixels).
- Enable the Noise Reduction tool. Chrominance noise is automatically removed and usually does not require any tweaking. If you are happy with keeping luminance noise which looks like film grain then you are done, else, keep reading.
- To remove luminance noise, set Detail recovery slider to 0, and increase the Luminance slider until the noise has been smoothed-away.
- Increase the Detail recovery slider until you regain a satisfactory level of detail.
- You may notice some small artifacts remain from the noise reduction process. Use the Median filter to remove them.
- While it is generally not recommended to combine sharpening with noise reduction, RawTherapee-5.5 has a "contrast threshold" adjuster in the Sharpening tool, thanks to which you can sharpen details while preserving the smoothness of uniform, flat areas.
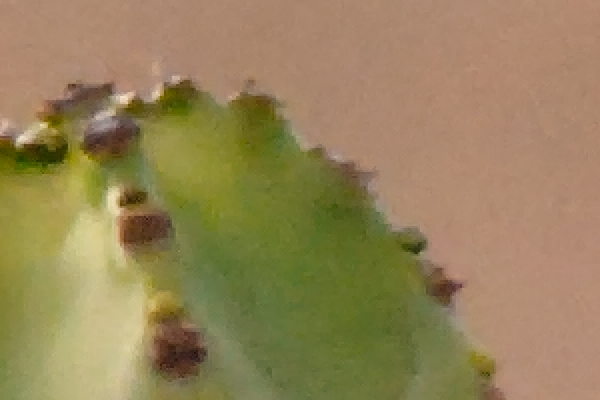
- Noise Reduction Step by Step

The noisy image.

Changing the demosaicing method to LMMSE eliminates the small maze-like patterns and makes the salt-and-pepper noise more clear.

Enabling the Hot/Dead Pixel Filter eliminates the salt-and-pepper noise.

Enabling automatic chromaticity noise reduction renders a pleasantly-grainy image.

Luminance noise was smoothed-away using the Luminance slider.

Detail was restored using the Detail recovery slider.

The median filter was used to eliminate left-over artifacts.
Sharpness was restored using an unsharp-mask with a contrast threshold to prevent sharpening areas which should be smooth.


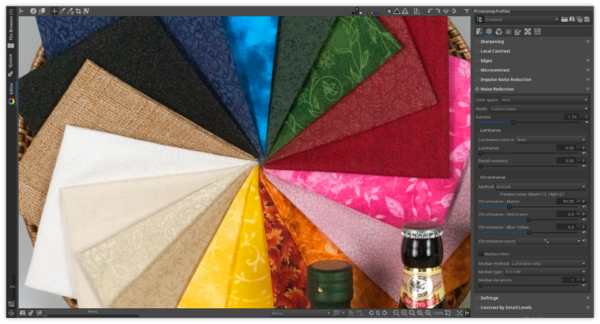
Interface
General
Closely examine large areas of strong saturation with fine detail - such as the pattern on a colored shirt or the petal of a flower - as you switch between the RGB and L*a*b* spaces.
The following images demonstrate the effects of various types of noise reduction, exaggerated for clarity. While the source image does not contain any very-low-frequency noise, it was chosen because it does display the effects (and side-effects) very well.
- Comparison of Noise Reduction - Color Spaces

The noisy image. Detail recovery will be intentionally left at 0, and chromaticity strength will be intentionally set very high, to emphasize effect.

Luminance noise reduction in L*a*b* space, conservative.

Luminance noise reduction in L*a*b* space, aggressive.

Luminance noise reduction in RGB space, conservative.

Luminance noise reduction in RGB space, aggressive.

Chrominance noise reduction in L*a*b* space, conservative.

Chrominance noise reduction in L*a*b* space, aggressive. Notice how colors bleed one into another in areas where one hue meets the other - navy blue bleeds into cyan, green bleeds into dull-red, dull-red bleeds into crimson-red, etc.
Chrominance noise reduction in RGB space, conservative.

Chrominance noise reduction in RGB space, aggressive. Low-frequency detail is lost.


Color Space
Noise reduction can be performed in the L*a*b* and RGB color spaces.
When working in the L*a*b* space, the L* channel is used for luminance and the a* and b* channels are used for chromaticity.
When working in the RGB space, the Y from the CIE XYZ color space is used for luminance and (X-Y) and (Y-Z) are used for chromaticity.
Mode
There are two general noise reduction "Modes" which control whether only high frequency or also low frequency noise is removed. Low frequency noise is noise whose blotches cover a large area; conversely, high frequency noise has smaller blotches which cover fewer pixels.
- Conservative - removes all except very low-frequency noise, so color detail is better preserved at the expense of not removing very large blotches. Use in most cases.
- Aggressive - removes also very low-frequency noise at the expense of being more aggressive with higher frequency noise. Use only on extremely noisy photos.
Gamma
Gamma varies noise reduction strength across the range of tones. Smaller gamma values let noise reduction affect all tones emphasizing the action on shadows, while higher gamma values limit the effect to brighter tones only.
Luminance

"Luminance control" lets you choose whether you want to manipulate the luminance noise reduction via sliders or a curve.
Adjusting the "Luminance" slider is equivalent to manipulating the amplitude of the luminance curve - both affect how strong the noise reduction effect is. The curve has the additional advantage of letting you control noise reduction strength as a function of the pixels' luminance - e.g. it allows you to have strong luminance noise reduction in the shadows and none in the highlights.
The "Detail recovery" slider allows you to recover structure while not reintroducing noise, unless you set this value too high.
Chrominance
- Modes
Chrominance noise reduction can be performed using one of three or four modes, according to the chosen configuration in "Preferences > Performance & Quality > Noise Reduction":
Tool mode - Standard:
- Manual
- Automatic global
- Preview
Tool mode - Expert:
- Manual
- Automatic global
- Auto multi-zones
- Preview multi-zones
- Preview noise
The "Preview noise" indicator gives the estimated chromatic noise values after "Chrominance" processing:
- Mean: estimates the average noise value across all channels.
- High: estimate the highest noise value across all channels.
Mode: Manual
The three sliders and the curve act on the full image. You control the settings manually.
- Chrominance - Master
Controls the strength of chrominance noise reduction independently of the other two sliders.
- Chrominance - Red-Green
Reduce/boost noise reduction in the red-green channel (a* in L*a*b*).
- Chrominance - Blue-Yellow
Reduce/boost noise reduction in the blue-yellow channel (b* in L*a*b*).
The chrominance curve lets you control chrominance noise as a function of the pixels' chrominance - e.g. it allows you to have strong chrominance noise reduction in areas of low saturation and weak noise reduction in areas of high saturation. This curve modulates the "Master", "Red-Green" and "Blue-Yellow" sliders' action by multiplying their values by the curve ordinate. For example, if the master slider is set to 30 and the curve is at mid-height, the equivalent result will be about 45. It can be useful for example in "Automatic global" mode to boost the grey or drab areas that will have a setting often too weak due to the settings average value. These grey areas are those where the visible noise become unpleasant, on the contrary to the very saturated areas where the same noise level (less visible) is acceptable.
Automatic global
The algorithm splits the image into multiple cells. For each cell the following are calculated:
- An average noise level for the red-green channel and the blue-yellow channel.
- A maximum noise level for the same channels.
Preview
This mode is only operational when zoomed to 100% or more. It analyzes the areas currently visible in the preview (if you are zoomed to 100% or more) and calculates:
- An average noise level for the red-green channel and the blue-yellow channel.
- A maximum noise level for the same channels.
The three sliders - Master, Red-Green and Blue-Yellow - as well as the "Preview noise" values, are updated accordingly.
If you would like to keep the currently calculated values then you should switch back to "manual" mode, else the values will be re-calculated when you pan or when you copy the profile to other images.
Auto multi-zones
Only available in "Expert" mode.
This mode is available chiefly to denoise images which cannot fit in RAM as a whole.
This mode is only operational when saving the output image - its affects are not visible in the preview regardless of zoom level!
The image is split into tiles. Each tile has a vertical and horizontal step of about 500 to 800 pixels. Depending on the image size and the chosen option in "Preferences > Performance & Quality > Number of tiles", the number of tiles can vary from 12 to over 120. Each of the three values are calculated separately for each tile, leading up to over 120 x 3 unique values. The tiles are blended at the seams to avoid artifacts if adjacent tiles' value differ strongly. This can be prevented via Preferences > Performance & Quality > Auto multi-zone smoothing":
- None: each tile's value are completely independent.
- Low: a part of the other tiles processing is taken into account, but in a weak way.
- High: a part of the other tiles processing is taken into account more strongly.
- Max: an average of all the tiles is used. This mode works like "Automatic global", but instead of using just 9 cells it uses all of the tiles (12 to over 120).
Preview multi-zones
Only available in "Expert" mode.
Identical to "Preview", but you have the possibility to evaluate with a very good approximation the result of "Auto multi-zones" with the help of the information given as a supplement to "Noise preview".
Under the label "Noise preview: Mean=x High=y", two lines are displayed:
- The first one gives the tile size in pixels, and its center position on the full image.
- The second one gives the preview size in pixels, and its center position on the full image.
The preview size depends on several parameters: zoom, lateral windows size.
You can adjusting the centers of the tiles and their size by panning the preview with the mouse and by modifying the zoom.
Median

Use this filter to remove tiny, sharp-looking artifacts left-over from noise reduction.
- Median Type
The median filter replaces each pixel with the median value of its neighboring pixels. The contiguous group of pixels being sampled is called the "windows". This window slides pixel by pixel over the entire image. You can choose the size of this window using the "Median type" drop-down. The larger the size, the longer it takes.
Available window sizes:
- 3x3 soft: treats 5 pixels in a 3x3 pixel window.
- ○●○
- ●●●
- ○●○
- 3x3: treats 9 pixels in a 3x3 pixel window.
- ●●●
- ●●●
- ●●●
- 5x5 soft: treats 13 pixels in a 5x5 pixel window.
- ○○●○○
- ○●●●○
- ●●●●●
- ○●●●○
- ○○●○○
- 5x5: treats 25 pixels in a 5x5 pixel window.
- ●●●●●
- ●●●●●
- ●●●●●
- ●●●●●
- ●●●●●
- 7x7: treats 49 pixels in a 7x7 pixel window.
- ●●●●●●●
- ●●●●●●●
- ●●●●●●●
- ●●●●●●●
- ●●●●●●●
- ●●●●●●●
- ●●●●●●●
- 9x9: treats 81 pixels in a 9x9 pixel window.
- ●●●●●●●●●
- ●●●●●●●●●
- ●●●●●●●●●
- ●●●●●●●●●
- ●●●●●●●●●
- ●●●●●●●●●
- ●●●●●●●●●
- ●●●●●●●●●
- ●●●●●●●●●
Sometimes it is possible to achieve higher quality running several iterations with a small window size than one iteration with a large window size.
- Median Method
You have five methods at your disposal:
- Luminance only: works in L*a*b* mode, but only affects the L* channel.
- Chroma only: works in L*a*b* mode, but only affects the a* and b* channels.
- Weighted L* (little) + a*b* (normal): affects all channels in L*a*b* mode, but acts more weakly on the L* channel.
- L*a*b*: affects all channels equally.
- RGB: works in RGB mode. In this mode the window size choice is limited to 3x3 soft, 3x3 and 5x5.
When using the "Luminance only" and "L*a*b*" methods, median filtering will be performed just after the wavelet step in the noise reduction pipeline. When using the "RGB" mode, it will be performed at the very end of the noise reduction pipeline.

You may wonder what other uses median filtering has apart from the elimination of pixels which strongly differ from their surrounding neighbors for aesthetic reasons. One of these benefits is a reduction in file size when saving to compressed formats such as JPEG and PNG. Median filtering removes variations which you will lose anyway if you downscale the image. You are also likely not to see these variations if you print the image. Removing them using median filtering can reduce the file size by even 40% (tested using JPEG compression strength 92 with "balanced quality" chroma subsampling), so give it a try if output file size is a factor.
Finally, the "chroma only" median filter method can be used as a complement to automatic chrominance noise reduction calculation - by reducing sharp outliers it can soften the calculated values, thereby avoiding fading out color detail too much.