Creating processing profiles for general use/de
Todo-List / State:
- Translation: open
- Content completely cleared: open
- Expression and didactics checked: open
- Spelling checked: open
Ready for publishing: no
Erstellung von Bearbeitungsprofilen für die allgemeine Verwendung
In RawTherapee werden die Sidecar-Files Bearbeitungsprofile bzw. auch Prozessprofile genannt. Ein ganzes Bündel an solchen Bearbeitungsprofilen wird mir RawTherapee mitgeliefert. So kannst du mit einem bereits existierendem Look starten und nach eigenem Geschmack modifizieren und somit etwas Zeit sparen. Ein Beispiel ist Pop 1. Es wird dein Bild lebendiger machen, Schatten etwas anheben und Details hervortreten lassen.
Du findest alle diese Standardprofile im Editor oben rechts über den Bearbeitungswerkzeugen, wenn du das Aufklappmenü unter Bearbeitungsprofile öffnest. Ebenso finden sich diese Profile in der Dateiverwaltung im Kontextmenü der Miniaturbilder unter Profiloperationen > Profil (selektiv) anwenden.
Lies auch die Anleitung unter Bearbeitungsprofile des Editors. Insbesondere auch bezüglich Teilprofilen und dem Umschaltbutton ![]() /
/![]() .
.
Bearbeitungsprofile erstellen

Du kannst deine eigenen Bearbeitungsprofile erstellen und sie im Aufklappmenü des Editors (unter Bearbeitungsprofile rechts oben) einfügen lassen.
- Öffne ein geeignetes Foto von dem ausgehend du so ein Start-Profil anlegen möchtest.
- Du kannst mit der Neutral-Einstellung beginnen oder eines der mitgelieferten Standardprofile laden.
- Führe nun die gewünschten Einstellungen zur Bildentwicklung aus.
- Beachte hierbei: Je spezifischer die Einstellungen für dieses Foto ausfallen, desto weniger werden sie in der Anwendung auf andere Fotos funktionieren. Orientiere also auf bestimmte Einstellungen, die für eine größere Zahl ähnlicher Fotos geeignet erscheinen bzw. nur eine Ausgangsbasis darstellen, von der ausgehend diese Bilder fertig entwickelt werden. Hier einige Anwendungsfälle: Hat deine Kamera einen sehr rauscharmen Sensor, das Objektiv aber eine nicht so hohe Schärfe, könntest du die Einstellungen zum Schärfen des Bildes dafür passend einstellen und das Profil nun auf alle Bilder anwende, die in dieser Kamera-Objektiv-Kombination aufgenommen wurden.
For example if your camera has a very low-noise sensor and your lens is not very sharp you could probably increase the default sharpening amount, or conversely if your camera has a noisy sensor you may want to apply a certain level of noise reduction by default. Maybe you do not want " Auto Levels" enabled by default, or maybe your camera underexposes all raws by 0.6EV so you could set the initial exposure compensation value to +0.6. Maybe you'd like to change the default input profile to " Custom", or set your name in the "Author" field and your website's URL in the "Source" field (see issue 2420) of the IPTC tab. You will generally want to leave the white balance set to "Camera" because if you set some custom value, it will only look as desired on photos which were shot under identical lighting - a temperature value of 6500 will not look the same in a photo taken in sunlight as it will in a photo taken on a cloudy day.
- When you are done tweaking, click the Save Current Profile icon File:Gtk-save-large.png in the Processing Profiles panel. Enter any name; you don't need to specify the extension - RawTherapee will add it for you. To have it appear in the drop-down list you need to save it to the "profiles" subfolder in the "config" folder - refer to the File Paths page to find out where this folder is on your system.
- Restart RawTherapee, and now your new processing profile will appear in the drop-down list under "My profiles".
Partial Processing Profiles
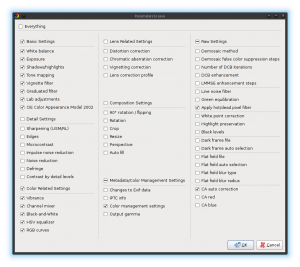
Sometimes, you will want to save only a subset of the parameters available, e.g. to avoid storing geometric parameters like rotate, crop and resize. In this case, hold the Control key while clicking on the Save button. When you select the output file name and click Save, a window will let you choose which parameters to select. You can then share these profiles with your friends or in our forum.
Remember that in order for a profile to be universally applicable to all photos of the same scene and situation (baby portrait photos in this example), you need to think of all the variations in all of the baby portrait photos you might want to apply it to. Remember that exposure will vary between shots, even if you shot the baby in a studio, as the little one is likely to be crawling around, and even more so if you upload your profile on the internet for other baby photographers with different cameras and different lighting gear to use, so instead of setting a specific exposure, such as +0.60, you should rather turn on Auto Levels. This applies to all other settings - remember to set just the bare minimum number of options to achieve the effect you want. Leave the rest untouched, as it is very likely that if you had set those other options, they will not apply well to other photos. If your processing profile is meant to make baby face photos look soft and cuddly by a clever mixture of highlight recovery, auto exposure, Lab and RGB tone curves, then don't enable noise reduction (as photos might be shot at different ISO values), don't set custom white balance (as light may have changed between shots), don’t rotate the photo, and so forth. All these superfluous parameters are likely to change between photos and not influence your soft baby look in any way, so turning them on will just litter your profile. Double-check these things before sharing your profiles.
Default Raw/Non-raw Processing Profile
RawTherapee uses a processing profile for every image you open. By default, the "(Neutral)" profile is used for non-raw images, and the "Default" one is used for raw photos. If you created your own processing profile and would like to use it for raw or non-raw images by default, you can do so from "Preferences > Image Processing > Default Processing Profile > For raw photos".

